
Crushed Velvet
Crushed Velvet: A Do-It-Yourself Guide by Christine Jonson
Use your iron to enhance the texture and bring out the color of elegant velvet fabric. In a previous life as a clothing manufacturer, I wanted to use a beautiful silk/rayon velvet in a Holiday Collection, but I didn’t want to deal with all the usual velvet hassles in a production setting, and fussing with a velvet board was just not in the picture. Crushed velvet was the obvious answer, but the pre-crushed velvet yardage I could buy looked cheap. So, I decided to crush my own.
An experiment with machine-washing the fabric created interesting random textures, but these completely disappeared when the fabric was dried! So, I turned up my iron with its Teflon® iron shoe and started to play with the velvet. The discovery was thrilling! The velvet looked great, but would it stay put? In short, if washed, no. But dry-cleaning was a different story; the fabric defiantly stayed crushed, in fact, I have a skirt that’s still nicely crushed after 10 years of wear and dry-cleanings and has needed only occasional touch-up crushing. The rest is history, at least for my company: Everything I made with crushed velvet sold in a flash. And, best of all, it was fun! So, let’s go through all the steps and preliminaries that will make crushed velvet one of your favorite techniques.
Choose a simple pattern. With any other allover surface treatment, you’ll get the best results crushing a garment that has simple lines and few pieces, since all lines and seams will be obscured by the textures, and the crushing will be easier to do on simple pieces. Avoid patterns that require careful fitting, since the crushing is done after the garment is finished and will shrink it. (The post-construction crushing offers a big plus, making it fine for you to freely press the garment from either side as needed during construction without fear of marring the surface.) For a skirt or pants pattern, choose a size larger than usual or add up to two inches of total extra circumferential ease at the side seams. You can increase the size of tops, too, but you really don’t need to; textures at shoulders and necklines will stretch back out on their own when worn but will still look fine.
Among the styles I’ve had good results with are A-line skirts and dresses, full-cut pants, tunic tops, simple jackets, and all accessories, such as scarves and soft bags. Pockets and collars are typically no problem and might even be highlighted with distinctive crushed patterns. Facings and linings can be crushed along with the outer fabric, by simply pressing harder through all the layers, and so far, I’ve never needed to line any of my crushed projects. Facings and collars can be interfaced with a lightweight fusible tricot, which doesn’t change the texture and won’t interfere with the crushing.
Use silk/rayon velvet blend and a Teflon® iron shoe to duplicate my results. You’ll get the most dramatic results from iridescent colors that really show off differences in the direction of the nap. Even a small swatch can be crushed quite effectively, so be sure to request samples to test. My iron is an industrial model, but any good steam iron with an add-on Teflon® shoe will do. Just set it to maximum heat and steam. High heat is required to set the crushing reliably, and is no danger if you use the shoe, which also eliminates any risk of imprinting the steam-hole patterns from an uncovered sole plate.
It’s easy, just crush one small portion at a time My crushing process brings out color variations by flattening the pile or nap of the velvet and adds surface texture (and reduces the size) by pleating the fabric. If you don’t like how something turns out, just toss the project into the washer and dryer, and start over. The steps are simple: press the entire, finished garment flat, then press it pleated in manageable sections. To help set the pleats, squeeze each pressed section with your hands as it dries and cools. The pressing-flat step smooths the garment and flattens the pile, setting the stage for all subsequent textures, and adding a lovely gloss to the fabric that in some cases, or for some sections of a garment, might be all that you choose to do. When pleating, you can follow the garment lines or the fabric grain, or not, crushing horizontally or vertically to add surface and design interest. If you add a bit of extra shaping at the waist or give a little more room at the hips or bust, you can vary the tightness of the pleating to customize the shaping. I often take deeper pleats at the waistline, and/or press out the pleats at the bust level to shape a garment. You can flatten any pleated texture without losing the crushed pattern by pressing from the wrong side of the fabric. The crushed pleats not only somewhat shrink the garment, but they also add elasticity to the fabric. I like to take advantage of this by taking increasingly deeper pleats toward the hem of an A-line skirt or wide-leg pants, so it seems to be straight or pegged when not in motion but swings out as soon as you take a step. This works beautifully on bias-cut full skirts, which naturally fit smoothly at the stomach and hips, and fall straight from the hip, but when you move and twirl around the fullness opens in a lovely and unexpected way. Can you tell I love this technique? Try it out!
A scarf is the perfect project on which to try this easy technique. Sew the scarf as a tube so both faces will be velvet. Press the scarf lightly, and then crush it. For random wrinkles crush the velvet in your fist like paper you’re throwing paper away, hold tight and then press firmly, trying not to let the fabric flatten out more than necessary.
To make leaf shapes fold pressed velvet wherever you want a leaf spine, then press the crease firmly with just the tip of the iron, sweeping the tip off the crease as you press. For bias textures as compared to crushed creases on the straight grain creases made along the bias are less linear and flatten out more readily. Like all other crushed textures, bias creases are still very visible in the nap after the crushed fabric has been pressed flat to remove the texture.


This is my friend Barbara making a crushed silk/rayon velvet tunic. She used pattern #1025 Base Wear Two and chose a size larger size than her measurement. She simply added several inches to the length to create a long tunic. She loved the sleeve length, neckline, and shapely waistline curves of the pattern. These are simple pattern changes that anyone can make at home. This pattern only involves front, back and sleeve pattern pieces. Super easy.
On the left you can see the finished tunic sewn prior to crushing. It has been topstitched with seams and hems pressed. Notice the sheen on the fabric from pressing the fabric without a velvet board.
Any favorite tunic pattern will work great with this technique. Think about adding a bit of ease at the side seams to allow for the amount of crushing you want. The video explains a bit more of these decisions.
On the right you now see the same silk/velvet tunic crushed following the technique as described here. Notice the curve at the waistline and the flattering use of the shape from the crushing technique at her discretion. You may continue to tighten and loosen the crushing as you see fit.
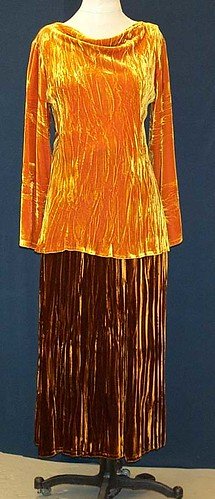
Here is my Cowl Neck Tunic #738 and A Line Skirt #1219 crushed using silk/rayon velvet. Both of these design lend themselves perfectly to this technique.
This is a simple version of a double sided scarf using this technique. Be sure to look at the video to see the leaves and other design you can create.


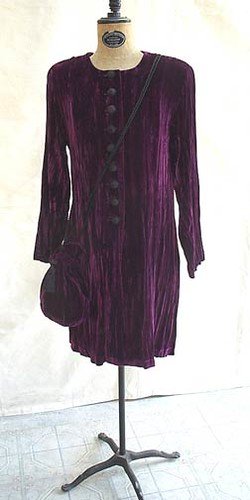
Double Collar Jacket pattern #427 sans collar and small drawstring bag.
Gorgeous evening slip dress and wrap. Check out the beautiful pattern options on Etsy.
