
Alternative Hems for Knit Fabrics
Optional Hems for Knits
By Jan Raley
I love the look of a perfectly executed twin-needle topstitched hem. I don’t seem to have any problem accomplishing this on cotton/lycra, double knits and some sweater knits. However, my sewing machine refuses to cooperate when I try to do this on lightweight knits like rayon jersey or ITY knits no matter how much I loosen or tighten the bobbin and/or needle threads. Here are some alternative methods if the twin needle is just not working for you.
Serged Hem
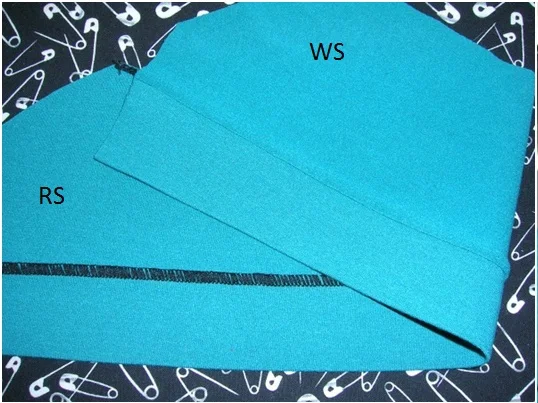
I discovered this method in my latest copy of Sew News. This results in a ‘faux band’ look or a seamline at the stitching line.
Keep in mind that this method will result in the final length being 1/2” shorter, so remember to mark your hem 1/2” longer than your desired length.
Press the hem as usual to the wrong side of the garment.

Turn the garment right side up and flip the hem allowance to the right side. There will be a folded edge with the raw edge sitting on top.

Serge along the folded edge through all 3 layers shaving off a tiny bit. The settings on my serger were Left Needle N, Right Needle N, Upper Looper 1.3, Lower Looper N, Stitch Width and Length both N and the Differential Feed at 1.3

Press hem flat with the seam allowance pressed away from the hem. The right side has a seamline and the look of a band. The wrong side has a serged seam.


Decorative Serged Hem
This method was born of the desire to have a finished look on both sides of the garment for my reversible pieces. It is similar to the Serged Hem, but this serged seam ends up on the right side of the garment and I used Wooly Nylon for a decorative look.
Keep in mind that this method will result in the final length being 1/2” shorter, so remember to mark your hem 1/2” longer than your desired length.
Press the hem as usual to the wrong side of the garment.
Press 1/4” Steam-a-Seam Lite to the wrong side of the top edge of the hem. Remove the paper backing and press the hem in place. I did this in order to keep the raw edge from slipping and to ensure that it would be caught in the serged hem since I can’t see the raw edge in this method.

Fold the hem again toward the wrong side of the garment, enclosing the raw edge of the hem in the fold.

With Wooly Nylon or another decorative thread in the upper looper, serge along the folded edge shaving off a tiny bit as you go. My serger settings were Needle N, Upper Looper -.3, Lower Looper +1, Stitch Length 1.5, Stitch Width 4.5 and Differential Feed set at 1.5.
Just before coming the the end where you meet the start of your serging, disengage the knives. Continue to serge to meet the beginning. Loosen the tensions in order to pull the garment away from the serger as opposed to serging off the edge at an angle. Tie the threads.
Press the hem flat with the serged seam away from the hem. The outside has a decorative line meant to be seen and the inside has a clean seamline.
Zig-Zag Blind Hem
Edge serge the lower edge of the garment.
Press hem to the wrong side.
Place garment wrong side down. Fold garment back until 1/4” – 3/8” of the serged edge of the hem is visible.
Set the machine for a wide, long zig-zag. I used a stitch that was 3.5 wide and 6.0 long. It also helps to use an edge-joining foot.
Align the fold to the center blade of the edge joining foot and start the needle just inside the fold. One side of the zig-zag will catch the serged edge and the other will take a bite into the fold.
Press the hem flat.